Oven No. 2

Oven fresh.

Tag: oven number 2

Brioche au Chocolat

by reenrene

[Tim] Holy bread! Give us this day our daily brioche and forgive us our sweet teeth, as we forgive those who diet against us. Like manna, this brioche was dumped. That’s the Oven Number 2 Process (ON2P): Prep em, bake em, dump um, eat em. Pardon my language but the pun is intentional – that’s good shit. Double stuffed tangy nuggets in-between those cheeks. Pastry cream is cream for pastries. If all words followed that logic, a chocolate bar would be a bar for chocolate, and a cook book would be a book for cooking. Which it is.

Sometimes you can let pictures speak for themselves, but I want is a picture to taste for itself, hear, smell, walk, and unicycle for itself . A fully sensual unicycling picture – that’d be my second wish if I had a magic genie bottle. The first would be for super powers (not needing to sleep), and I’d save my third for emergency circumstances.

Making brioche is fun… the filling made it fabulous. Why is that word affiliated with gays? And why is the word gay associated with homosexuals? This gay bread made me gay – hopefully it’ll make you gay too.

Here’s the recipe, shamelessly copied from this blog. They did it too, and the adage holds true: “There’s always someone on the internet better than you.”

Brioche au Chocolat
from Flour: Spectacular Recipes from Boston’s Flour Bakery + Cafe
makes 10 pastries

1/2 recipe Basic Brioche dough (recipe follows)

1 recipe Pastry Cream (recipe follows)
4 oz (114g) bittersweet chocolate (62 to 70 percent cacao), chopped, or bittersweet chocolate chips (just under 2/3 cup). POC Note: This pastry is not supersweet- the bittersweet chocolate adds a hint of sweetness with a bitter kick. If you are truly opposed to all bittersweetness and insist that your pastries must be perfectly sweet (Hey, to each his own)- use a good quality semisweet chocolate in its place.
1 egg

Line a baking sheet with parchment paper.

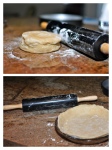
On a floured work surface, roll out the dough into a rectangle about 20 inches by 10 inches and 1/4 inch thick. It will have the consistency of cold, damp Play-Doh and should be fairly easy to roll. Position the rectangle so a long side is facing you. Spread the pastry cream evenly over the bottom half (a 20 by 5 inch section) of the rectangle. Fold the top half of the rectangle completely over the bottom half, then press down gently so the halves are smooshed together.

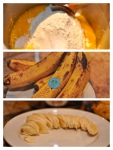
Use a bench scraper of a chef’s knife to cut the filled dough into 10 pieces, each about 2 inches wide; each piece will be about 2 by 5 inches. (At this point, the unbaked pastries can be tightly wrapped in plastic and frozen for up to 1 week. When ready to bake, thaw them, still wrapped, in the refrigerator overnight or at room temperature for 2 to 3 hours, then proceed as directed.)

Carefully transfer the brioche to the prepared baking sheet. Cover the pastries lightly with plastic wrap and place in a warm spot to proof for about 2 hours, or until the dough is puffy, pillowy, and soft. Position a rack in the center of the oven, and heat the oven to 350 degrees F.

In a small bowl, whisk the egg until blended. Gently brush the tops of the pastries with the beaten egg.

Bake for 35 to 45 minutes, or until golden brown. Let cool on the baking sheet on a wire rack for 20 to 30 minutes. The pastries tend to bake into one another in the oven, so break apart into 10 pieces. The pastries are best served warm or within 4 hours of baking. They can be stored in an airtight container at room temperature for up to 1 day, and then warmed in a 300-degree-F oven for 5 minutes before serving.

Basic Brioche
from Flour: Spectacular Recipes from Boston’s Flour Bakery + Cafe

*Makes 2 loaves
Note: Do not halve this recipe. There won’t be enough dough to engage the dough hook of your mixer, and the dough won’t get the workout it needs to become a light, fluffy bread. Don’t worry about having too much: Both the dough and the baked loaves freeze well, and having a freezer filled with brioche is never a bad thing.

2 1/4 cups (315 grams) unbleached all-purpose flour
2 1/4 cups (340 grams) bread flour
1 1/2 packages (3 1/4 teaspoons) active dry yeast, or 1 ounce (28 grams) fresh cake yeast
1/2 cup plus 1 tablespoon (82 grams) sugar
1 tablespoon kosher salt
1/2 cup (120 grams) cold water
6 eggs
1 cup plus 6 tablespoons (2 3/4 sticks/310 grams) unsalted butter, at room temperature, cut into 10 to 12 pieces

In a stand mixer fitted with the dough hook, combine the all-purpose flour, bread flour, yeast, sugar, salt, water, and 5 of the eggs. Beat on low speed for 3 to 4 minutes, or until all of the ingredients have come together. Stop the mixer as needed to scrape the sides and bottom of the bowl to make sure all of the flour is incorporated into the wet ingredients. Once the dough has come together, beat on low speed for another 3 to 4 minutes. The dough will be very stiff and seem quite dry.

On low speed, add the butter one piece at a time, mixing after each addition until it disappears into the dough. Then, continue mixing on low speed for about 10 minutes, stopping the mixer occasionally to scrape the sides and bottom of the bowl. It is important for all of the butter to be mixed thoroughly into the dough. If necessary, stop the mixer occasionally and break up the dough with your hands to help mix in the butter.

Once the butter is completely incorporated, turn up the speed to medium and beat for another 15 minutes, or until the dough becomes sticky, soft, and somewhat shiny. It will take some time to come together. It will look shaggy and questionable at the start and then eventually will turn smooth and silky. Then, turn the speed to medium-high and beat for about 1 minute. You should hear the dough make a slap-slap-slap sound as it hits the sides of the bowl. Test the dough by pulling at it: it should stretch a bit and have a little give. If it seems wet and loose and more like a batter than a dough, add a few tablespoons of flour and mix until it comes together. If it breaks off into pieces when you pull at it, continue to mix on medium speed for another 2 to 3 minutes, or until it develops more strength and stretches when you grab it. It is ready when you can gather it all together and pick it up in one piece.

Place the dough in a large bowl or plastic container and cover it with plastic wrap, pressing the wrap directly onto the surface of the dough. Let the dough proof in the refrigerator for at least 6 hours or up to overnight. At this point, you can freeze the dough in an airtight container for up to 1 week.

To make two brioche loaves, line the bottom and sides of two 9 by 5 inch loaf pans with parchment, or butter the pans liberally. Divide the dough in half and press each piece into about a 9-inch square. The dough will feel like cold, clammy Play-Doh. Facing the square, fold down the top one-third toward yo, and then fold up the bottom one-third, as if folding a letter. Press to join these layers. Turn the folded dough over and place it, seam-side down in one of the prepared pans. Repeat with the second piece of dough, placing it in the second prepared pan.

Cover the loaves lightly with plastic wrap and place in a warm spot to proof for about 4 to 5 hours, or until the loaves have nearly doubled in size. They should have risen to the rim of the pan and be rounded on top. When you poke at the dough, it should feel soft, pillowy and light, as if it’s filled with air – because it is! At this point, the texture of the loaves always reminds me a bit of touching a water balloon.

Position a rack in the center of the oven, and heat the oven to 350 degrees F.

In a small bowl, whisk the remaining egg until blended. Gently brush the tops of the loaves with the beaten egg.

Bake for 35 to 45 minutes, or until the tops and sides of the loaves are completely golden brown. Let cool in the pans on wire racks for 30 minutes, then turn the loaves out of the pans and continue to cool on the racks.

The bread can be stored tightly wrapped in plastic wrap at room temperature for up to 3 days (if it is older than 3 days, try toasting int) or in the freezer for up to 1 month.

Pastry Cream
from Flour: Spectacular Recipes from Boston’s Flour Bakery + Cafe

1 1/4 cups (300g) milk
1/2 cup (100g) sugar
1/4 cup (30g) cake flour
1/2 tsp kosher salt
4 egg yolks
1 tsp vanilla extract

In a medium saucepan, scald the milk over medium-high heat (bubbles start to form around the edges of the pan, but the milk is not boiling). While the milk is heating, in a small bowl, stir together the sugar, flour, and salt. (Mixing the flour with the sugar will prevent the flour from clumping when you add it to the egg yolks.) In a medium bowl, whisk the egg yolks until blended, then slowly whisk in the flour mixture. The mixture will be thick and pasty.

Remove the milk from the heat and slowly add it to the egg-flour mixture, a little at a time, whisking constantly. When all of the milk has been incorporated, return the contents of the bowl to the saucepan and place over medium heat. Whisk continuously and vigorously for about 3 minutes, or until the mixture thickens and comes to a boil. At first, the mixture will be very frothy and liquid; as it cooks longer, it will slowly start to thicken until the frothy bubbles disappear and it becomes more viscous. Once it thickens, stop whisking every few seconds to see if the mixture has come to a boil. If it has not, keep whisking vigorously. As soon as you see it bubbling, immediately go back to whisking for just 10 seconds, and then remove the pan from the heat. Boiling the mixture will thicken it and cook out the flour taste, but if you let it boil for longer than 10 seconds, the mixture can become grainy.

Pour the mixture through a fine-mesh sieve into a small heat-proof bowl. Stir in the vanilla, then cover with plastic wrap, placing it directly on the surface of the cream. This will prevent a skin from forming. Refrigerate for at least 4 hours, or until cold, or up to 3 days.

Lemon-Blueberry Pie

by reenrene

[Tim] From the initial color-glaze of your eyes over this picture, you might think that we baked a beet pie, stained red like a newborn’s umbilical cord. But no, as I said in a comment, we do desserts here at Oven Number 2, and beets… wait, are there beet desserts? I’ve never had one. Holy Pan, there are. Behold, beet pie. Expect it.

[Irene] La, la, la, la, la. Sorry everyone… I haven’t really been present on the blog. Writing is not my forte, and I have been mostly preparing the photos (anddd I was lazy….). Tim has been the one mostly working on the baking; I’ve just been on the sidelines watching and photographing.

[Tim] The reasons for the influx of blueberry blood are two; first, because I had to use frozen grapes because I didn’t have enough fresh ones per the recipe (8 stinking cups of blueberries?!) and they’re hard to dry; second, because I boiled two cups of the shrunken heads and made a blueberry brain mash, a sloppy and sticky revelry to which I added the rest.

[Tim] When you were a kid and found little black and blue berries in the parks and playgrounds, did you ever eat one? Were they poisonous? I never heard of anyone dying from them. They said that you would get diarrhea. Another form of blue gooeyness.

[Tim] I like my pie as I do the shadow of a falcon crest — sweet, red, and soggy as a state-fair goer’s underarm. For crust enthusiasts, you would want to boil down the blueberry juice mix more than I.

[Irene] Reading through Tim’s writing portions, I never know what to write or how to fit in. I guess I just have to create my own mold right?

Good for almost everything pie dough by Dori Greenspan: Click Here

Double-Crusted Blueberry Pie by Dori Greenspan

Ingredients:

  • 2 1/2 pints fresh blueberries
  • 1 cup sugar, or little more, to taste, plus more for dusting
  • 1/2 cup all-purpose flour
  • Pinch of salt
  • Coarsely grated zest of 1/2 lemon
  • Squirt of fresh lemon juice, or a little more, to taste
  • 1/4 cup dry bread crumbs (you can use packaged unseasoned crumbs)
  • 1 large egg, beaten with 1 teaspoon water, for egg wash
  • Sugar, for dusting

Getting Ready:

  • Butter 9-inch pie plate
  • Work on a well-floured surface (or between wax paper or plastic wrap), roll out one piece of the dough to a thickness of about 1/8 inch.
  • Fit the dough into the buttered pie plate and trim the edges to a 1/2-inchc overhang.
  • Roll the other piece of dough into a 1/8-inch-thick circle and place it on a baking sheet lined with parchment or a silicone mat.
  • Cover both the circle and the pie plate with plastic wrap and refrigerate while you preheat the oven and prepare the filling

Getting Ready to Bake:

  • Position a rack in the lower third of the oven and pre-heat the oven to 425 degrees F
  • Put the berries in a large bowl and gently stir in the sugar, flour, salt, zest and juice
  • Let sit for about 5 minutes
  • Taste the filling and add more sugar and/or lemon juice, if needed
  • Remove the pie shell and top crust from the refrigerator.
  • Sprinkle an even layer of the bread crumbs over the bottom of the shell.
  • Give the filling a last stir and turn it into the crust.
  • Using your fingertips, moisten the rim of the bottom crust with a little cold water. Center the top crust over the filling and gently press the top crust against the bottom.
  • Either fold the overhang from the top crust under the bottom crust and crimp the edges attractively or press the top crust against the bottom crust and trim the overhang from both crusts even with the rim of the pie plate.
  • If you’ve pressed and trimmed the crust, use the tines of a fork to press the two crusts together securely.
  • Using a small sharp knife, cut 4 slits in the top crust and cut a circle out of the center, then lift the plate onto the baking sheet. (If you have time, refrigerate the pie for about 30 minutes. The pie can also be wrapped airtight and frozen for up to 2 months. Glaze and sugar it before you put it in the oven and add at least 15 minutes to the baking time.)
  • Brush the top crust with the egg wash, then sprinkle the curst with a little sugar–just to give it sparkle.
  • Bake the pie for 30 minutes.
  • Reduce the oven temperature to 375 degrees F, and bake the pie for another 30 minutes or so (total baking time is about 1 hour), or until the crust is a beautiful golden brown and the filling is bubbling up through the slits. If the crust seems to be browning too quickly, make a loose foil tent for the pie.
  • Transfer the pie to a rack and let it cool–and settle–for at least 30 minutes before serving.

Cranberry Lime Galette

by reenrene

[Tim] What’s the favorite thing I’ve baked so far?

This!

[Tim] “… What the flugelhorn is a galette?”

I don’t know; the word reminds me of gazelles, and it functions like pizza with not-pizza ingredients (the pizza enthused radicals are out for my head, as pizza crust, of course, is not made by folding dough over the pizza itself, but from leaving space around the edges of the pie and allowing the yeast and oxygen to bubble and crispen up).

The flugelicious part of this recipe isn’t the weird word that starts with g, however, but the cranberries, the taciturn red bulbs of sugar-transfused sweetness, bombs of tenacious tartiness that tickle the throat and belly, transcending the tedium of the office, the toska of tradition, the tendency to stop looking up, testifying detoxifying supple tenderness to thankful tastebuds, turning the tiny corners of your lips to rise on their mischevious tiptoes, trolling in the deep and swirling timbres of its crimson treasury, its tremolo of humming sucroses, its titillating and enriching emancipation of the day’s transgressions, curving your tongue in a luscious tango of flavor. The teeth peek out from behind the heavy theater curtains to give a blushing salutation, and -that- is what is known to sages and hermits and maegis as a Galette Smile. You should’ve tasted this.

[Tim] If you can’t stand the sweet, get out of the oven. If you can’t stand the meat, get out of Fogo de Chao. If you can’t stand my feet, I should probably start wearing socks. Speaking of off-white, browning things, the apples that are added make this recipe an apple-pie and cranberry-pie a polymerized fusion monster masterpiece. Make this and enjoy.

[Tim] Last thing; On the delay on posting – Sorry. It’s not the oven that’s constipated, it’s us. Slow and steady wins the race, but an unsteady and procrastinating turtle psychologist in a race against a caffeine-pumped distraction hare is a losing stratagem.

[Irene] Yeah…. I fell asleep that night before he started baking…. at 8pm…….. So props to Sarah for taking pictures. She took all of them except for the first and the last one. Yay.

Cranberry Lime Galette by Dorie Greenspan

Ingredients:

  • Good for Almost Everything Pie Dough for a single crust, chilled
  • 3 tablespoons ground nuts (walnuts, almonds, pecans or skinned hazelnuts)
  • 3 tablespoons dry bread crumbs
  • 2 cups cranberries, fresh or frozen (if frozen, thaw and pat dry)
  • 1 medium apple, peeled, cored and cut into 1/2-inch chunks
  • 1/3 cup moise, plump dried cranberries (optional)
  • 3/4 cup (packed) light brown sugar
  • A 1 1/2-inch piece of fresh ginger, peeled and finely chopped
  • Grated zest of 1 lime
  • Juice of 1/2 lime
  • 3 tablespoons raspberry jam or jelly
  • Decorating (corse) or granulated sugar, for dusting
  • Confectioners’ sugar, for dusting

Instructions:

  1. Center rack in oven & preheat to 400°F
  2. Line baking sheet with parchment
  3. To make it easier to move the pie dough onto the baking sheet, roll it between sheets of parchment or wax paper or plastic wrap. Work on a well-floured surface, taking care to keep the dough moving by turning it and flouring the surface often.
  4. Rock the dough into a large 1/8=inch-thick circle
  5. Trim the dough to a 13-inch diameter
  6. Transfer dough to the baking sheet and keep it coved in the refrigerator while making the filling
  7. Mix together the nuts & bread crumbs
  8. Toss together all the remaining ingredients (except decorating & confectioners’ sugar for dusting) in a bowl, stirring just to mix
  9. Remove crust from refrigerator. Use cake pan or pot lid and tip of a blunt kitchen knife to gently trace a 9 inch circle in the center of the dough–this is for the filling
  10. Sprinkle the center circle with the nut and crumb mixture and top with the filling
  11. Gently lift the unfilled border of dough up and onto the filling: as you lift the dough and place it on the filling, it will pleat.
  12. Brush the dough very lightly with a little wate, then sprinkle it with a teaspoon or two of decorating/granulated sugar
  13. Bake for 35-50 minutes, until crust is brown, when cranberries have poped and filling is bubbling
  14. When done, place baking sheet on a rack to cool for 10 minutes
  15. Serve when galette is just warm or when it has reached room temperature, lightly dust with confectioners’ sugar

Chocolate-Choclate Cupcakes

by reenrene

[Tim] We’re back…in brown. That didn’t quite roll off the tongue, but neither do these sweet oven pies – they go the opposite direction. Soft, sweet, and decadent, these are our ‘lazy baker”s way of satisfying the maximum amount of people while doing a minimum amount of boiling, cooling, and waiting. Hoo-rah!

Dorie Greenspan's double chocolate cupcakes

[Tim] You are what you consume, and in this blog we consume Cupcake Wars, Cupcake Sisters, and DC Cupcakes. We believe in food euphoria, food comas, food bloats, and food drunkenness. Cake your taste buds onto your identity — become a member of the cupcake cult.

 To be a cupcakist is to put your faith in the church of cute and sweet, to believe that childhood is a magical land accessible via a palm-size serving of sugar and fat (and the occasional sprinkle).

Jennie Yabroff, 2009.

A row of eggs

[Tim] Learn to crack eggs with one hand  Checked that one off my list. To learn new things, all you need is practice. Also on my learning list: hula hooping, contact juggling, poi spinning, and navigation. The last one is practical because I get lost a lot. Better to stay in the kitchen, but alas, the world out there serves too much food to miss!

[Tim] Digestion collages. Ovens process raw food like humans process cooked food, but its mouth is also it butt.  How dessert comes out the other end so stunningly is the incredible miracle of oven biotics.

[Tim] White flour and yellow butter goes brown over time. I think it’s a metaphor for a sticky and dependent US-China alliance going to the poopers. India comes out on top.

[Tim] My next cupcake idea is to make cupcakes with human milk or human butter. Then I’d decorate them to look like breasts. The problem has been that it’s been getting harder and harder to get human milk off the blackmarket, and the milk bank won’t let me get any. (PM me if you know/are a donor.)

[Tim] At this point in digestion, it’s looking like politics: more of the same. And yet, oh so good to watch and be entertained. And disgusted. One oven’s feces is another man’s tasties. Heard that from a wise man on top of a refrigerator.

Chocolate-Chocolate Cupackes by Dorie Greenspan

Ingredients for the cupcakes:

  • 1 cup all-purpose flour
  • 1/4 cup unsweetened cocoa powder
  • 1/4 teaspoon baking powder
  • 1/4 teaspoon baking soda
  • 1 stick (8 tablespoons) unsalted butter, at room temperature
  • 3/4 cup sugar
  • 1 large egg
  • 1 large egg yolk
  • 1/2 teaspoon pure vanilla extract
  • 1/2 cup buttermilk
  • 2 ounces bittersweet chocolate melted and cooled

Ingredients for the Glaze:

  • 3 ounces bittersweet chocolate, coarsely chopped
  • 1 tablespoon confectioner’s sugar, sifted
  • 2 tablespoons cold unsalted butter, cut into 6 pieces

Getting  Ready:

  1. Center the rack in the oven
  2. Preheat oven to 350°F
  3. Prepare 12 molds in regular size muffin pan with muffin cups/OR butter them, dust with flower and tap out excess

Making the Cupcakes:

  1. Whisk together flour, cocoa, baking powder, baking soda & salt
  2. In another large bowl Beat the butter at medium speed until soft and creamy
  3. Add the sugar & beat for 2 min until blended into the butter
  4. Add the egg, then the yolk, beating for 1 minute after each addition
  5. Beat in the vanilla
  6. Reduce the mixer speed to low & add half the dry ingredients
  7. Add the butter milk, mixing until incorporated, then mix in the rest of the dry ingredients
  8. Add the melted chocolate
  9. Distribute evenly among the 12 muffin molds
  10. Bake for 22-25 minutes
  11. Let cool for 5 minutes before unmolding them

Making the Glaze:

  1. Melt the chocolate in a heatproof bowl over a saucepan of simmering water
  2. transfer the bowl to the counter & let it stand for 5 minutes
  3. Stir in the confectioners’ sugar
  4. Add the pieces of cold butter
  5. Add the glaze on top of the cupcakes with a small metal icing spatula

Banana Cream Pie

by reenrene

[Tim] Peel a joke, slip on the punchline. Try it:

How do you catch King Kong? Hang upside down and make a noise like a banana.

Why did the banana go to see the doctor? The banana was not peeling very well.

What do you do if you see a blue banana? Try to cheer it up.

Banana jokes taste of the royal cornback rattler of a banana god.  The whipped cream, the god’s gravy. This pie, its prime and tender ribs. Creamy bones hit the sweet tooth sweet spot.

It took three times to get the cream filling right. 18 eggs later, Irene got it done. Yippee!


[Irene] Lol, 18 eggs later… At least we saved all the egg whites for breakfast the next morning. I must say I really liked this banana cream pie. Tim especially likes pies, so many of the recipes he chooses have some type of crust. The custard just unfortunately took three tries to get it right. This is just another reminder to ALWAYS read the recipe before you begin & UNDERSTAND the recipe before you begin. Somehow the best turnouts are either when I’m baking side-by-side with him, or not paying attention to him at all (when I’m nowhere near). Well, I’d really like to do a cake sometimes soon. I loveeee making cakes, what do you guys think? Any suggestions to what type of baked goods we should try next? Enjoy pictures in our gallery below!


Banana Cream Pie

Ingredients
For the custard:
  • 2 cups whole milk
  • 6 large egg yolks
  • 1/2 cup (packed) light brown sugar, pressed through a sieve
  • 1/3 cup cornstarch, sifted
  • 1/2 teaspoon ground cinnamon
  • 1/8 teaspoon freshly grated nutmeg
  • Pinch of salt
  • 1 teaspoon pure vanilla extract
  • 3 tablespoons cold unsalted butter, cut into bits
  • 3 ripe but firm bananas
  • 1 9-inch single crust made with Good for Almost Everything Pie Dough, fully baked and cooled (recipe is below)
For the topping:
  • 1 cup cold heavy cream
  • 2 tablespoons confectioners’ sugar, sifted
  • 1 teaspoon pure vanilla extract
  • 2 tablespoons sour cream
Method
  • To make the custard: Bring the milk to the boil.
  • Meanwhile, in a large heavy-bottomed saucepan, whisk the yolks together with the brown sugar, cornstarch, cinnamon, nutmeg and salt until well blended and thick. Whisking without stopping, drizzle in about 1/4 cup of the hot milk — this will temper, or warm, the yolks so they won’t curdle — then, still whisking, add the remainder of the milk in a steady stream. Put the pan over medium heat and, whisking constantly (make sure to get into the edges of the pan), bring the mixture to a boil. Boil, still whisking, for 1 to 2 minutes before removing from the heat.
  • Whisk in the vanilla extract. Let stand for 5 minutes, then whisk in the bits of butter, stirring until they are fully incorporated and the custard is smooth and silky. You can either press a piece of plastic wrap against the surface of the custard to create an airtight seal and refrigerate the custard until cold or, if you want to cool the custard quickly — as I always do — put the bowl into a larger bowl filled with ice cubes and cold water and stir occasionally until it is thoroughly chilled, about 20 minutes. (If it’s more convenient, you can refrigerate the custard, tightly covered, for up to 3 days.)
  • When you are ready to assemble the pie, peel the bananas and cut them on a shallow diagonal into 1/4-inch-thick slices.
  • Whisk the cold custard vigorously to loosen it, and spread about one quarter of it over the bottom of the pie crust — it will be a thin layer. Top with half of the banana slices. Repeat, adding a thin layer of pastry cream and the remaining bananas, then smooth the rest of the pastry cream over the last layer of bananas.
  • To make the topping: Working with a stand mixer fitted with the whisk attachment or with a hand mixer in a large bowl, beat the cream until it just starts to thicken. Beat in the confectioners’ sugar and vanilla and continue to beat until the cream holds firm peaks. Switch to a rubber spatula and gently fold in the sour cream.
  • To finish: Spoon the whipped cream over the filling and spread it evenly to the edges of the custard. Serve, or refrigerate until needed.
  • Serving: I like to serve the pie as soon as it is assembled, when the pastry cream and whipped cream are cold but not really chilled and the crust has not been refrigerated. I think this is when the pie is at its best — but, trust me, it will still be wonderful if you serve it from the fridge. For me, this is a go-with-coffee pie.
  • Storing: The pastry cream can be made ahead, and you can keep the assembled pie in the fridge for a few hours, but you really must eat it the day it is made — no hardship.

Source: Adapted from “Baking From My Home to Yours” by Dorie Greenspan (Houghton-Mifflin, 2006)

Good for Almost Everything Pie Dough

Ingredients
For a 9-inch single crust:
  • 1 1/2 cups all-purpose flour
  • 2 tablespoons sugar
  • 3/4 teaspoon salt
  • 1 1/4 sticks (10 tablespoons) very cold (frozen is fine) unsalted butter, cut into 10 pieces
  • 2 1/2 tablespoons very cold (frozen is even better) vegetable shortening, cut into 2 pieces
  • About 1/4 cup ice water.
Method
  • Put the flour, sugar and salt in a food processor fitted with a metal blade; pulse just to combine the ingredients. Drop in the butter and shortening and pulse only until the butter and shortening are cut into the flour. Don’t overdo the mixing— what you’re aiming for is to have some pieces the size of fat green peas and others the size of barley. Pulsing the machine on and off, gradually add about 6 tablespoons of the water if making a double crust, 3 tablespoons if making a single crust— add a little water and pulse once, add some more water, pulse again and keep going that way. Then use a few long pulses to get the water into the flour. If, after a dozen or so pulses, the dough doesn’t look evenly moistened or form soft curds, pulse in as much of the remaining water as necessary. or even a few drops more, to get a dough that will stick together when pinched. Big pieces of butter are fine. Scrape the dough out of the work bowl and onto a work surface.
  • Gather the dough into a ball, flatten it into a disk, and wrap it in plastic. Refrigerate the dough for at least 1 hour before rolling. (If your ingredients were very cold and you worked quickly, though, you might be able to roll the dough immediately: the dough should be as cold as if it had just come out of the fridge.)
  • To roll out the dough: Have a buttered pie plate at hand.
  • You can roll the dough out on a floured surface or between sheets of wax paper or plastic wrap or in a rolling slipcover. (I usually roll this dough out on the floured counter.) If you are working on a counter, turn the dough over frequently and keep the counter floured. If you are rolling between paper, plastic or a in slipcover, make sure to turn the dough over often and to lift the paper, plastic or cover frequently so that it doesn’t roll into the dough and form creases.
  • If you’ve got time, slide the rolled-out dough into the fridge for about 20 minutes to rest and firm up.
  • Fit the dough into the pie plate and, using a pair of scissors, cut the excess dough to a 1/4- to 1/2-inch overhang. Fold the dough under on itself, so that it hangs over the edge just a tad, and flute or pinch the crust to make a decorative edge. Alternatively, you can finish the crust by pressing it with the tines of a fork.
  • To partially or fully bake a single crust: Refrigerate the crust while you preheat the oven to 400 degrees.
  • Butter the shiny side of a piece of aluminum foil, fit the foil, buttered side down, tightly against the crust and fill with dried beans or rice or pie weights. Put the pie plate on a baking sheet and bake the crust for 25 minutes. Carefully remove the foil and weights and, if the crust has puffed, press it down gently with the back of a spoon. For a partially baked crust, return the pie plate to the oven and bake for about 8 minutes more, or until the crust is very lightly colored. To fully bake the crust, bake until golden brown, about another 10 minutes. Transfer the pie plate to a cooling rack and cool to room temperature before filling.
  • Storing: Well wrapped, the dough can be kept in the refrigerator for up to 5 days or frozen for up to 2 months. While the fully baked crust can be packed airtight and frozen for up to 2 months, I prefer to freeze the unbaked crust in the pan, and to bake it directly from the freezer — it has a fresher flavor. Just add about 5 minutes to the baking time.

Source: Adapted from “Baking From My Home to Yours” by Dorie Greenspan (Houghton-Mifflin, 2006)

http://dinersjournal.blogs.nytimes.com/2010/11/17/the-bakers-apprentice-banana-cream-pie/

Thumbprint Cookies (with Raspberry Jam)

by reenrene

[Irene] Hello everybody! (I didn’t really know how I wanted to start writing… ) Well, it’s been a while since we’ve made/eaten these cookies. We haven’t been able to get our posts up soon enough. BUT. I wanted to show you guys our new sifter I bought at HomeGoods (for like 6 bucks). Instead of using strainers, we now have a real sifter! And that made me excited and want to share it with you guys. Below the sifter, you can see that there is a picture of a bag of chopped hazelnuts! This was our first time working with hazelnuts, and we had no clue where to buy them. I ended up going to three different grocery stores at 11pm to find these nuts, and we didn’t start baking until after midnight.. That’s why these pictures aren’t the best.. they’re all taken at night.

Night baking, bam.

Anyways, earlier that day when we ended work, I had planned to go to the mall, so I told Tim to go buy Hazelnuts at Cub Foods. We he left work, he went to cubs and said he couldn’t find the hazelnuts. Later that night when I went on the scavenger hunt to buy the nuts, I stopped at Lunds, Rainbows, and finally Cubs. I went to the baking aisle of Cubs, and there they were! The chopped hazelnuts. My brother has reallyyyyyy big eyes (大眼睛!) Anyways, [tip] if you’re ever looking for chopped hazelnuts or other seasonal nuts for baking, you may find them in the baking section next to the chocolate chips.

[Tim] She sounds like a middle-aged stay at home mom, talking about a sifter like that. Just put the flour in the bowl and try not to spill too much. People who tell you that you need to buy a sifter are dirty scumbags who want your washingtons.

[Tim] Jam is liquid candy, with real fruit flavors. It won’t make your head turn into a raspberry though, so it’s 999% inferior to gushers.

[Tim] Juxtapose top right and bottom right. Real life will never match up to what you see in the pictures, kiddies, so stop joking yourself. Tastes better than ink though. Octopus black ink pasta might have something to say about those fighting words. They’ll sucker punch you with their suckers, beak attack, and suck raspberry jam from your neck. You sucker.

[Tim] All I see is a plate of evil red eyes.

[Irene] Hmmmm, if anyone thinks Tim is a getting too weird/violent/odd with the baking blog, comment below.

The Most Extraordinary French Lemon Cream Tart

by reenrene

Sweet tart dough

The making of the lemon tart crust. Who doesn’t love butter?

[Tim] Desserts are merely manifestations of butter. At least, this one is. Of course, you understand that tart crusts are basically butter, but did you know that two and a half sticks of butter are added to make the lemon cream creamy?

[Irene] Tip for y’all making crusts: When you make the crust, make sure the bottom layer is not too thick so you have more dough for the sides.

Look at that lemon zest, delicious no?

[Tim] Brilliant technique: combining the zest and sugar and just pinching them together with your fingertips. It makes the sugar smell sooo good, and combines the aromas and flavors well, I think.

[Irene] Oh the zest + sugar combo was amazing to smell. (Smelled like Burt’s Bees cuticle cream!)

The VitaMix blender is a strong one.

[Tim] Oven No. 2 is still in potty training. Today I learned how to use a blender, or rather, how not to use one. I was using a spoon to get the cream at the edges of the blender that weren’t being combined. My mother got very concerned and had me turn it off because my hand was too close to the blade. I turned it back on without the cap, and it went everywhere. Then I did it again.We lost between 50-60% of the lemon cream.

[Irene] So here is what I was referring to in our last post. This was the second accident that night.

Adding on to Tim’s writing.. He was holding a spoon, not a spatula, or the thingy that the VitaMix comes with. Since the butter/lemon concoction was hot~steaming, he could’ve easily let go of the metal spoon into the 2+ horsepower blender. That blender could easily take off your hand.

[Tim] I wasn’t sticking my hand into the mix, guys. At worst, the spoon would’ve fallen in and rattled everything up before I turned it off. Ok Ima stop catfighting now.

[Irene] Yes, you weren’t sticking in your hand. BUT, if  the spoon fell in, it wouldn’t have just rattled. The spoon could’ve flung out of the blender and into your eye! The power of two horses crashing into your eye..

[Tim] But hey, it worked out. Good thing my crust was shallow. Not much to say about this recipe — it tastes excellent. Lemon lovers lock lips: this tart is legit.

PS. I googled “The Most Extraordinary French Lemon Cream Tart” to see who else had made this recipe from Dorie Greenspan’s book, and there are several dozen. Ours looks the best though! EAT IT… literally.

Blueberry Crumb Cake

by reenrene

"Disasterous firsts"

[Irene] If you read our About page, you will know that this is the beginning of baking project, our attempt to bake 3-5 recipes a week. We both have a passion for baking and cooking. This love for food came from sharing our time and enjoyment with family in the kitchen and dinner table. Tim had come up with the idea, and since I love photography and he loves to write, we decided to begin a baking blog.

[Tim] Thanks for that introduction, Irene. Now, lets talk baking. This week, we learn valuable lessons about recipes. The recipe is vastly important, and vastly annoying, like paying your taxes, or cleaning up after your pooping baby. Keep these things in mind before you start your own baking blog:

1. Read, read, read the recipe. Beforehand. It’s amateur, yeah, but completely necessary. You wouldn’t believe how easy it is to say, “Hey, I want to make a lemon tart tonight,” and then half way through, realize that you don’t have any sour cream because you didn’t read the freakin’ recipe. That happened here.

2. You better read the recipe. This crumble cake decided to be the mosquito that bites the tip of your nose, because it required buttermilk, which we didn’t have. Irene added lemon juice to milk, which gave us a substitute. But then I didn’t measure it, and added a cup of the stuff, rather than a half cup. My fault, but I wouldn’t have done it if I just had to measure buttermilk…

3. If you go off the recipe, you’re in for a bad time. So read it. Story: so we don’t have a food processor. Again, amateur. We needed it to combine the nuts and sugar for the crumble top, so we used a blender instead. The crumble overblended and turned into a mushy paste. Oh boy. We added oats and (groan) flax t0 get the right texture. If you’ve had flax before, you know how deceptive these cake look. If you haven’t then count yourself lucky, and be blissful in your food ignorance.

All our recipes will be from the following two books:

Chang, Joanne. Flour: Spectacular Recipes from Boston’s Flour Bakery + Cafe. San Francisco: Chronicle, 2010. Print. Click

Greenspan, Dorie. Baking: From My Home to Yours. Boston: Houghton Mifflin, 2006. Print. Click